Search This Blog

Monday, September 23, 2013

Legos -- to go!

Let's get real for a second. Kids love Legos, but parents don't (all the time). The little pieces get lost all over the house and it's not exactly fun when you step on one of the little sharp shapes -- surprise, you found another Lego!

Well, I found a solution on Pinterest that seems to be working for my little one. It's a wooden Lego storage box with a play area attached on top! Once she's done, the Legos go back into their new cozy (and portable) home, so we don't endure any more Lego tragedies.  


I started off making one for my nephew for his birthday, but quickly got signed up to make one for my daughter, other nieces/nephews and relatives.

NOTE: IF YOU AREN'T THE CRAFTY TYPE -- I WOULD BE HAPPY TO MAKE ONE FOR YOU FOR THE RIGHT PRICE! 


Here's what you need:
Wooden box (or tray)
Paint (I used Acrylic) & Paint Brushes
Lego Building Plate
Scissors (or some type of tool to cute plate)
Paint Pens
Hot Glue Gun
Legos (optional)

I got this at Hobby Lobby, but many craft stores have wooden boxes or trays. The medium sized box is $7.99, but got them for $4.79 using a 40% off coupon on the Hobby Lobby App. Large boxes are $9.99, but $5.99 with coupon!! 
I bought the plates at a Lego store --- these run anywhere from $4.99 to $14.99 depending on size.  I think I saw these for sale at Target too.

WHAT TO DO:

1. Paint the boxes (I did two layers of paint). Let dry overnight.
2. Write on the boxes with paint pens.
3. Cut the building plates (or get your hubby to do this with tools like I did). Make sure you round the edges so they aren't sharp. 
4. Hot glue the plate to the box. This is kinda tricky because the glue tends to get hard before the entire plate is on. 
5. Add Legos.
6. Watch kids open up their gift and smile!


For my niece, I added glitter paint (the same color green) to the inside to give it a little bling-bling!


I think my girl uses her Lego box about three times a week and the Legos NEVER get lost!

Enjoy! 

Feel free to pin!

Kathryn 


Follow Me on Pinterest

Wednesday, September 18, 2013

Chalkboard Craze!

It seems like everywhere you turn nowadays, you see chalkboards. I think Pinterest has increased the popularity big time -- that's how I became a fan! 


PROJECT 1: Chalkboard Transformation

My daughter's artwork!

This was my very first chalkboard project. I found an old chalkboard (you know, the green kind where if it gets scratched you can see the particle board below) at Goodwill for three bucks! 

I painted the frame white and painted three coats of chalkboard paint (see below for the kind I used) directly on the ole green chalkboard. If you do this, make sure what you are painting on is smooth because it makes writing on it so much easier!

PROJECT 2: Chalkboard Picture Frame


After my first project, I just HAD to find more ways to use up all that chalkboard paint! 

I ended up finding a square unfinished piece of wood (I believe at Hobby Lobby), did a little sanding (no much, really) and added primer paint that I found in the basement. I then added three coats of chalkboard paint ... three seems to be the magic number for chalkboard paint!


As for the accessories, I cut out flags from a yellowed book I never wanted to read again (and plan on using for other projects) and added scrapbook letters to the flags. The scrapbook letters were white at first, so I used permanent marker to fix that (see below)! 

I then very carefully hot glued the flags to a string and attached the string to the back. The small clothes pins were painted and also hot glued to the wood.

I love changing out the pictures and adding personal messages!


PROJECT 3: Chalkboard Wedding Gift


This was a wedding gift for my friend. 

Instead of using a piece of wood, I decided to try out a cardboard-like square and painted it (yes, three times) with chalkboard paint. I think it looks cute, but chalk didn't work on it, so I had to do the date with a paint marker to look like chalk. Next time around, I would use the unfinished wood like the previous project. 

I believe I bought all my supplies at Hobby Lobby. For the accessories, I bought the already cut flags and stamped their initials on it. Used clips and string to hang them -- and used hot glue to secure the string on the back.

I hot glued the clips to the frame and put scrapbook paper in the clips (can be replaced with pictures from their wedding day).

The "V" was painted with Annie Sloan Paint and hot glued onto the frame too. Again, next time, I would use a piece of wood as the frame instead of cardboard.


PROJECT 4: Chalkboard First Day of School Sign


I promise I'm not getting any royalties from Hobby Lobby, but once again --- that's where I got this chalkboard. It also came with the ribbon attached and was less than six bucks (you can get if for less with your Hobby Lobby App which usually has a 40% off coupon)! The expensive part was buying the chalkboard markers --- those came at a $10.99 price tag for four markers -- YIKES! But, they look so much better than regular chalk.

The cool thing is --- we can erase and use every school year (or at least until she stops letting me take first day of school pictures of her -- sniff sniff).


If you just don't have the patience or time to make your own chalkboard from scratch, you can always buy them already made and then add your very own special touches. Most craft stores have a section of already painted wood art (like the ladybug, flower and butterfly you see in the picture). Just paint the frame whatever color you want and hot glue those pre-made pieces of art to the board -- done! 

Feel free to pin!

Enjoy!

Kathryn

Follow Me on Pinterest

Wednesday, September 11, 2013

Busy Bag Bargain - Part 2

My first "Busy Bag Bargain" post was SOOOOOOO popular (I'm assuming a thank you card needs to be sent to Pinterest for that), I decided to blog again about our most recent Busy Bag swap.

For the newbies, a Busy Bag is just that ... it's a bag to keep your little one busy while you're out-and-about or for those times when you just need to get laundry done (we've all been there, right??!).

These bags are simple to make on your own, but here's a secret ... if you include your friends in an actual swap, you will rack up with multiple great (and cheap) games/learning tools for your wee one.

Let's get straight to the bags! We had nine moms participate, so we each ended up with nine bags. Here's a look at what we took home!

#1 - Felt Scenes

This is the one I made. I got the idea on Pinterest (imagine that) and ended up making three felt scenes per bag with all the fix'ins. I'm not gonna lie, this wasn't an easy or quick project and ended with a few blisters, but I think they turned out great (if I may say so myself). And, if you're wondering ... I didn't use any templates (with the exception of my hubby making one for the lobster -- that was a tough one for me!).


If you look closely, you will notice I used the leftover blue from the top of the water to make a sky on the tree scene. The leaves were cut out of leftover felt from making the fish. 

The tree, water and ice cream cone are glued on using a hot glue gun.
Here's where my honesty comes in. I did cut "sprinkles" from the extra felt (not pictured), which worked out great, but I "felt" (get it), like it needed more. I threw in some sparkly balls to give this one texture (yeah right, I was just tired of cutting! That' s another reason why you see flower buttons on the tree scene - ha!) 


 #2- Felt Pizza with Menu Cards

Another mom endured (and survived) some felt cutting. This is a felt pizza with dough, sauce and a whole lot of yumming look'in fix'ins (cheese, pepperoni, sausage, mushrooms and peppers). What I like about this one, it comes with menus that teach kids how to count. Order up!


  #3- Name Spelling Sign

These are great for those trying to learn how to spell their name. It's basically a paper strip with cut-outs (you could laminate). All you have to do is write their name on the cut-outs and glue them on. You could also put magnets on the back of the loose letters and stick the strip to the fridge or a metal cookie sheet to make it easier. 


This one also comes with a nifty pocket on the back!

#4- Fabulous Frogs

This is another great counting game. My daughter LOVES playing with the froggies. This mom got the idea from another blog (click here for the "Walking By the Way" instructions). It's pretty much card stock, stamps and frogs! 


#5- Alphabet and Number Tracing/Matching

This one is so cool because there are many options (which means keeping hands and minds busy).  On one side, your kids can practice tracing letters and their name. On the other, it's all about numbers. It's laminated, so the fun can keep going and going and going. 

But, wait ... there's MORE! This mom also included foam cut-outs (with magnets on the back) of letters and numbers. You can put the laminated sheet on a metal cookie sheet too for a matching game ... how genius!


#6- Pasta Sorting

This is, not only, a mix and match coloring pasta project, it's also a mix and match the type of pasta project. It's a BOGO! Some cups have Yellow, Orange and Green written on them and other cups have the actual pasta taped to them. This mom had so much leftover pasta, she ended up using the extra as a dish during our swap!


#7- Magnet Strips

Every kid likes magnets, right??!! This one is a magnet strip glued to a popsicle stick. Using paper clips, they can color coordinate or you can tell them a pattern to re-create.


#8- Threading Beads

Beads are always popular too! And, what makes this one better, it comes with cool pipe cleaners to entertain for hours. Kids can either match the beads to the pipe cleaners or create their own designs!


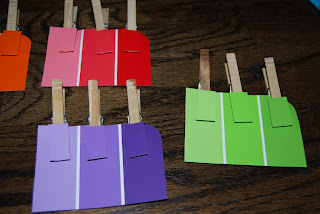
#9- Paint Color Matching

This is a great bag for those learning colors (and shades of color). Go to your local painting store and grab some free paint paper samples. Cut out colors to match the background and glue to clothespins. Easy Peasy!


Well, I hope you enjoyed this second addition of my "Busy Bag Bargain" post. To read my first post, please click here!

Feel free to pin! 

Enjoy!

Kathryn
Follow Me on Pinterest

Sunday, February 17, 2013

How to Interview your kid(s)


I grew up in a video friendly household where everything from beach trips to holidays were captured on tape. We also did silly skits that may someday come back to haunt me, but I don't think my parents every videotaped one-on-one interviews with us. 

Well, I've decided to start a new birthday tradition after seeing pins on Pinterest. I mean, how hard can it be to interview a three-year-old after a television career of interviewing celebrities, criminals, former Presidents and politicians? I'm not gonna lie, I had butterflies in my stomach anticipating how THIS interview would go.


I was pleasantly surprised! I handed my daughter a lollipop and let her pick a place to interview. She loved it so much, she asked to be interviewed again a few days later!


Tips for Interviewing Children:

1. Have them pick the place to do the interview. When I was a reporter, I would ask kids where they hang out the most because that's where they are comfortable. Usually, you get better interviews if they are familiar with their surroundings. Of course, you may have to adjust lighting if they pick a dark area. 

2. Don't get stressed out if they don't answer correctly. It will be just as fun to watch later in life. Depending on their age, you may have to give them ideas to keep going.

3. Get on their level! You don't want to shoot the interview too high or too low. Make sure the tripod or hand-held camera is at their eye-level. 

4. Print out a list of possible questions (keep a copy on your computer so you can print out every year), but don't be too strict because answers can lead to a different question. Try to ask the questions in a conversational way -- kids do better with having a conversation rather than reading a list of questions off a piece of paper.

5. Don't ask yes or no questions. Instead of asking, "Do you like carrots?" ... ask "What foods do you like?"

6. Ask non-question questions. Sometimes, you don't even need to ask a question. For instance, if your child says, "Mommy and Daddy are my best friends." Instead of asking a question, you could say, "That's nice and sweet. Your Mommy and Daddy love you very much." ... stop talking and pause for a bit. That may result with kids saying more.

7. Make sure your interview area is quiet (turn off cell phones...etc). Interruption could lead to a ruined interview!

8. At the end of the interview, ask them if there is anything to add. You might be surprised!

9. Write down the answers. Once the interview is over, go back and type the answers into a word document. One day, it might be nice to make a photo book for each year with answers and pictures from that birthday! Now, wouldn't that be a nice wedding gift? 

Questions:


1. What is your name?
2. How old are you?
3. What is your Mom’s name?
4. What does your Mom do during the day?
5. What is your Dad’s name?
6. What does your Dad do during the day?
7. What is your favorite color?
8. What do you like to eat? (What don’t you like to eat?)
9. Who is your best friend? Why?
10. What is your favorite song?  Can you sing it for me? (Depending on their age, they could even show you a dance or play music ... etc)
11. What is your favorite animal? 
12. What is your favorite place to go?
13. What is your favorite thing to do?
14. What do you like about your Mommy?
15. What do you like about your Daddy?
16. What do you like to take to bed with you at night? 
17. What is your favorite book or toy?
18. What kind of birthday party are you having?
19. What have you learned lately?
20. What do you want to be when you grow up?
21. Is there anything else you want to say about turning (#)?

(And, of course, you could add the question, "Why?" after any of these questions if you want them to explain a little more.)

I had so much fun doing the interview with my daughter. 

Here are some cute highlights from my interview:

*How old are you? She holds up three fingers and says, "Fifteen!"

* What does your Mom do during the day? She does stuff all day, just like me.

* What is your favorite place to go? To houses. This one and that one (she pointed out the window to houses in the neighborhood). 

* What do you want to be when you grow up? Um, probably that piggy we rode on that train. (she was talking about the famous Pink Pig in Atlanta).

* Who is your best friend? Mommy and Daddy. I said, "Awe, you're my best friend and I love you!" She added, "Awe." I said, "I love you so much." and she said, "I love you too!" 

At some point, maybe as a high school graduation gift, I will edit the answers to each question from year to year to show how much she's grown and how her personality has changed!


Enjoy!

Feel free to pin!

Kathryn

Follow Me on Pinterest

Sunday, January 13, 2013

One Day Dresser Re-do!


First and foremost, let me get my true feelings out there ...

I "HEART" ANNIE SLOAN (chalk paint)!

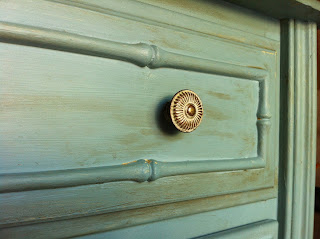
Okay, now that it's out there, let me tell you more. My love affair all started with Pinterest. I found before pictures of old yucky furniture and after pictures of pieces you could find in a magazine. I quickly found the common thread -- all painted with Annie Sloan chalk paint. 

I fell in love at first sight and HAD to have the Duck Egg paint! 


Here's what I found about A.S. chalk paint:

1. The paint and wax is a bit pricey. The Duck Egg 32 fl. ounces cost $38.00 and each wax cost $28.00, but I still have paint and wax leftover for other projects. At this point, it was a need ... not a want! I couldn't get it out of my mind!

2. Depending on where you live, it might be difficult to find (I googled it and found a nearby antique store with a fairly good selection of colors.)

3. Last, but not least -- you don't have to prime or sand before painting. Yes, you heard me right! All I did was clean off the cob webs and dirt and paint.

4. You can seriously get a dresser done in ONE day!


I already had a free dresser from my sister.
It was a yucky mustard yellow piece (see below) from my grandparent's condo in Florida.  


This dresser survived Hurricane Ivan and years in my niece's bedroom, so I felt it could also survive my first dresser re-do! 

And it worked ... see below!


Here's what I did:
1. Cleaned off the cob webs and dirt with a wet rag.
2. Took out the drawers and all the knobs/handles. 
3. I taped off the top of the dresser because I wanted to keep it white.
4. Started painting with the chalk paint.


5. After it dried (it didn't take long), I took an old t-shirt and dipped it into the Annie Sloan dark wax. I rubbed the wax on corners and places where it makes it look antique.
6. I used another old t-shirt and rubbed the clear wax all over the dresser.


7. I put the original knobs back on and took off the tape ... DONE!


My original plan was to take out the top drawers and add cute baskets, but the original knobs looked so much better with a different color behind them. I ended up keeping all the drawers in! 

My obsession with Annie Sloan paint doesn't end here though. I started stalking my house for more things to paint because it's so easy!


Here's a clock I got for free from my mom's house. 


Instead of adding wax, I sanded some of the chalk paint away to give it a distressed look.


And, this is a picture frame I got at consignment for $3.00.


Again, sanded some paint away for a distressed look.


If my husband didn't stop me, our whole house would be full of Duck Egg pieces!


TOTAL COST = around $100.00 
(the cost of paint and wax because the dresser was free!)


Now, my sister wants the dresser back --- no way!

Feel free to pin on Pinterest!

Enjoy!

Kathryn


Follow Me on Pinterest